Shooting interior real estate photos is an essential skill for agents, photographers, and homeowners who want to showcase properties in their best light. Great interior photos capture not just the space, but the feeling of warmth, depth, and flow that helps potential buyers imagine living there.
Whether you’re photographing a cozy apartment or a luxury home, mastering the right techniques and camera settings can make the difference between an average photo and a stunning listing image that grabs attention instantly.
Before You Shoot: Prepare and Plan for Success
Stage the Space
A well-prepared home makes photography easier and produces cleaner, more professional-looking results.
- Declutter and tidy: Remove personal items, straighten furniture, and ensure surfaces are clean.
- Turn on all lights: Light every lamp and overhead fixture to create a bright, welcoming look.
- Hide distractions: Remove cords, trash bins, and small clutter that can make photos look messy.
Plan Your Shots
Before you even set up your tripod, take a walk through the property.
- Identify key angles: Look for corners that show the most depth and open space.
- Create a shot list: Include wide shots of each major room and a few close-up details for variety.
- Control natural light: Schedule your shoot during the brightest part of the day for ample natural light, but prepare to balance the contrast between windows and interior lighting.
Camera Settings for Interior Real Estate Photography
To achieve sharp, well-balanced photos, camera settings matter as much as composition. Use these proven configurations for consistent, high-quality results.
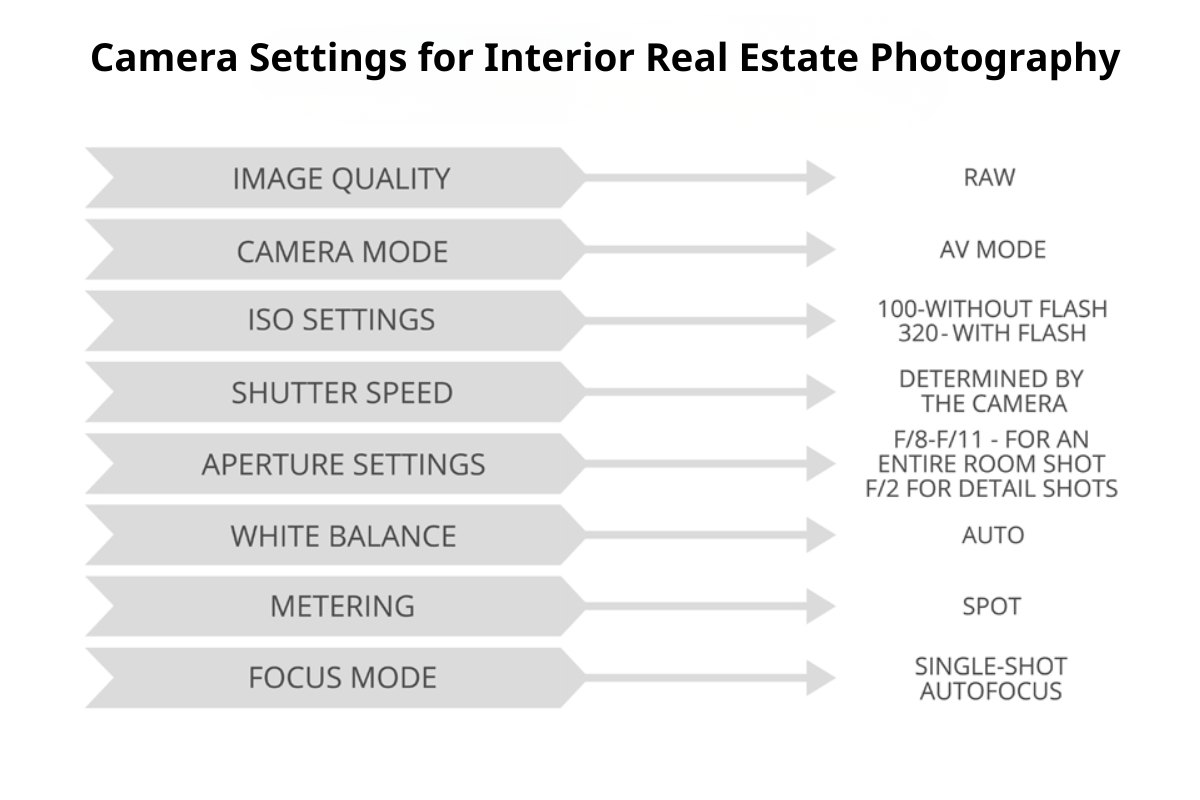
Mode
Use Aperture Priority (Av) or Manual (M) mode for full control over exposure and depth of field.
ISO
Keep your ISO low (100–400) to reduce noise and maintain clarity.
Aperture
- f/11 to f/16 for wide shots to ensure the entire room is sharp.
- f/4 for close-up or detail shots where you want a soft background blur.
File Format
Always shoot in RAW format for maximum flexibility in post-processing.
Lens
Use a wide-angle lens (10–24mm for crop sensors, 16–35mm for full-frame) to capture the full scope of the room without distortion.
Shooting Techniques: Capturing the Perfect Shot
Use a Tripod
A tripod is essential for interior photography. It allows you to shoot at lower shutter speeds without blur and ensures consistent framing across exposures.
Keep the Camera Level
Crooked lines can ruin an otherwise great photo.
- Use your camera’s built-in grid or electronic level to keep vertical lines (walls, door frames) perfectly straight.
Adjust Camera Height
Position your camera between waist and chest level (approximately 4–5 feet off the ground) for a natural and balanced perspective.
Bracket Your Exposures
For scenes with bright windows and dark corners, use exposure bracketing:
- Take 3–9 shots at different exposures (e.g., -2, 0, +2 EV).
- Later, merge them into a single HDR image to balance highlights and shadows beautifully.
Use Off-Camera Flash (Optional)
If lighting is uneven, use an off-camera flash to gently fill dark areas without creating glare or harsh reflections. Bounce the light off walls or ceilings for a natural, soft look.
Post-Processing: Bring Out the Best in Every Photo
Editing is where your photos truly come to life. Use professional software like Adobe Lightroom, Photoshop, or dedicated real estate editing tools for best results.
Correct Distortion
Wide-angle lenses can cause barrel distortion or leaning walls. Use the lens correction tool to straighten lines and maintain architectural accuracy.
Merge Exposures
If you used bracketing, merge your images into an HDR composite to capture every detail — from bright window light to subtle interior shadows.
Adjust White Balance
Interiors often mix natural and artificial light, causing color casts. Adjust the white balance so that whites look true, and the overall image feels warm and inviting.
Final Enhancements
- Boost brightness and contrast slightly.
- Sharpen details for clarity.
- Avoid over-editing to maintain a realistic look.
Pro Tip: Enhance Your Interiors with Professional Editing
Even with perfect shooting technique, post-production can elevate your photos to a higher level. Services like Picpee specialize in real estate photo editing, offering HDR blending, color correction, and lens adjustments that make your images pop while preserving realism.
Outsourcing your editing not only saves time but also ensures every listing meets professional standards — crucial in today’s competitive market.
Conclusion
Mastering how to shoot interior real estate photos takes practice, precision, and attention to detail. From thoughtful staging and controlled lighting to technical camera settings and clean post-production, each step contributes to photos that sell homes faster and for higher prices.
By following these techniques — or partnering with editing experts like Picpee — you can turn any interior space into a visual story that resonates with buyers and elevates your real estate brand.

 Single Exposure
 Room Cleaning
 Reels
Reels Blended Brackets (HDR)
 Changing Seasons
 Slideshows
 Flambient
 Water in Pool
 Individual
 360° Image Enhancement
 Lawn Replacement
 Team
Team Virtual Staging
 Rain to Shine
 Add Person
 Remodel
 Custom 2D
 Remove Person
 360° Image
 Custom 3D
 Background Replacement
 Day to Dusk
 Property Video
 Cut Outs
 Day to Twilight
 Walkthrough Video
 Change color